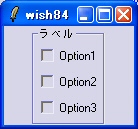
基本形は、-textオプションでラベルを指定するやり方です。
pack [labelframe .f1 -text ラベル -pady 2 -padx 2]

set t 0
foreach str {Option1 Option2 Option3} {
    checkbutton .f1.b$t -text $str
    pack .f1.b$t -side top -fill x -pady 2
    incr t
}
|
ラベルの位置は、-labelanchorオプションで変更できます。
デフォルトは"nw"になっていますが、"ne"にすると雰囲気が変わります。
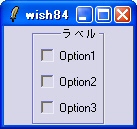
pack [labelframe .f1 -text ラベル -pady 2 -padx 2 -labelanchor ne]

set t 0
foreach str {Option1 Option2 Option3} {
    checkbutton .f1.b$t -text $str
    pack .f1.b$t -side top -fill x -pady 2
    incr t
}
|
ラベルの代わりに-labelwidgetオプションを使うとWidgetを指定できます。
以下はラベルの代わりにcheckbuttonを使った例です。
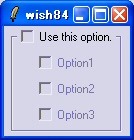

pack [labelframe .f1 -pady 2 -padx 2]
checkbutton .f1.cb -text "Use this option." -variable lfdummy2 \
	-command "lfEnableButtons .f1" -padx 0
.f1 configure -labelwidget .f1.cb

set t 0
foreach str {Option1 Option2 Option3} {
    checkbutton .f1.b$t -text $str
    pack .f1.b$t -side top -fill x -pady 2
    incr t
}

proc lfEnableButtons {w} {
    foreach child [winfo children $w] {
        if {$child == "$w.cb"} continue
        if {$::lfdummy2} {
            $child configure -state normal
        } else {
            $child configure -state disabled
        }
    }
}
lfEnableButtons .f1
|
基本的には、ラベルの代わりにどんなWidgetも指定できますが、
実用的なのはcheckbuttonとmessageくらいでしょうか。
以下はラベルの代わりにmessageを使った例です。
長いラベルは自動的に折り返すので便利かもしれません。
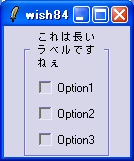
pack [labelframe .f1 -text ラベル -pady 2 -padx 2]
message .f1.m -text {これは長いラベルですねぇ} -justify left
.f1 configure -labelwidget .f1.m

set t 0
foreach str {Option1 Option2 Option3} {
    checkbutton .f1.b$t -text $str
    pack .f1.b$t -side top -fill x -pady 2
    incr t
}
|
labelframeの機能を使いこなすとGUIの表現力に格段の差が出ることは間違いないですね。